I had a customer asking if it’s possible to move their existing Drupal site to a container based version in Kubernetes, especially AKS (Azure Kubernetes Service). This is the description of how a migration can be achieved. There’s a few steps involved:
- Export of the MySQL database
- Export of the site directory
- Creation of docker images (optional)
- Validation in Docker
- Deployment in Kubernetes
The first step I made was to export the database using phpAdmin like described here: https://www.drupal.org/node/81993 because using tools like mysqldump create a different format that can lead to serious issues later. After that I exported the whole site directory from the existing system. It should have all important directories like sites, modules and themes because the folder will be mounted or copied in the future.
While you could use the Docker Hub images directly you might want to build your own ones to add some more features. I used the standard MySQL image but added some features to the Drupal one (Dockerfile):
FROM drupal:8.9.7

RUN apt-get update && apt-get install -y \
	curl \
	git \
	default-mysql-client \
	vim \
	wget

RUN php -r "copy('https://getcomposer.org/installer', 'composer-setup.php');" && \
	php composer-setup.php && \
	mv composer.phar /usr/local/bin/composer && \
	php -r "unlink('composer-setup.php');"

RUN wget -O drush.phar https://github.com/drush-ops/drush-launcher/releases/download/0.4.2/drush.phar && \
	chmod +x drush.phar && \
	mv drush.phar /usr/local/bin/drush
After a successful build using
docker build -t my-drupal ./
I started the MySQL container first to create and import the database (docker ps to get the container ID):
docker run --name mysql -e MYSQL_ROOT_PASSWORD='master' -p 3306:3306 -d mysql:5.7.21
docker ps
docker exec -i CONTAINERID mysql -u root -pmaster -e "CREATE DATABASE mysitedb"
docker exec -i CONTAINERID mysql -u root -pmaster mysitedb < /Users/cjohannsen/Development/mysite/mysitedb.sql
The creation and import can be verified using:
docker exec -it CONTAINERID /bin/bash
and checking the /var/lib/mysql directory or connect to the database with a user.
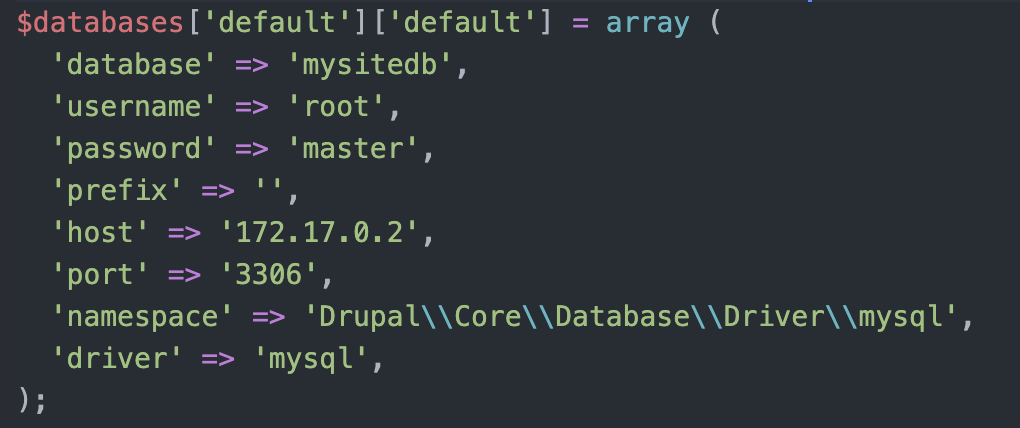
With the MySQL database running I decided to start the Drupal container and adding the existing site as a volume. There’s just one thing to change upfront and that’s the database connection. I changed the MySQL connection data in sites/default/settings.php to point to the MySQL container. You can check for the IP using
docker inspect bridge
and note the IP address (172.17.0.2 in my case). While this is valid for testing locally it will be a service in Kubernetes instead of an IP address. I started the Drupal container using:
docker run --name my-drupal -p 8080:80 -d \
  -v /Users/cjohannsen/Desktop/Development/mysite/www:/opt/drupal/web \
my-drupal:8.9.7
Now that both containers are running I was able to check the website http://localhost:8080 and everything worked fine. I used two different approaches to import the data: import (MySQL) and mount (Drupal) which will be an import in Kubernetes.
After I validated the import in Docker I started to translate this into Kubernetes. Before you can deploy an new AKS cluster it’s necessary to install the Azure CLI as well as the Kubernetes CLI and login into Azure:
az login
This let’s you connect to Azure and create a new cluster calling:
az aks create --resource-group MyWebSite --name MyCluster --node-count 3 --generate-ssh-keys --kubernetes-version 1.18.8
After a few minutes the cluster becomes available and the Kubernetes config can be added using:
az aks get-credentials --resource-group MyWebSite --name MyCluster
After this I was able to create a new cluster using version 1.18.8 (stable) while 1.19.3 was in preview. If you want you can create a static public IP in case your DNS should be switched as well.
az network public-ip create --resource-group MyWebSite --name mypublicip --sku Standard --allocation-method static
I added this IP in the Drupal deployment now (drupal-deployment.yaml):
apiVersion: v1
kind: Service
metadata:
  name: drupal
  labels:
    app: drupal
spec:
  ports:
    - name: http
      port: 80
      protocol: TCP
  selector:
    app: drupal
  type: LoadBalancer
  #loadBalancerIP: xxx.xxx.xxx.xxx
---
apiVersion: v1
kind: PersistentVolumeClaim
metadata:
  name: drupal-pv-claim
  labels:
    app: drupal
spec:
  accessModes:
    - ReadWriteOnce
  #storageClassName: managed-premium-retain
  resources:
    requests:
      storage: 20Gi
---
apiVersion: apps/v1
kind: Deployment
metadata:
  name: drupal
  labels:
    app: drupal
spec:
  selector:
    matchLabels:
      app: drupal
      tier: frontend
  strategy:
    type: Recreate
  replicas: 1
  template:
    metadata:
      labels:
        app: drupal
        tier: frontend
    spec:
      containers:
      - image: my-drupal:8.9.7
        name: drupal
        ports:
        - containerPort: 80
          name: drupal
        volumeMounts:
        - name: drupal-persistent-storage
          mountPath: /opt/drupal/web
      volumes:
      - name: drupal-persistent-storage
        persistentVolumeClaim:
          claimName: drupal-pv-claim
You can also deploy Drupal without the loadBalancerIP and storageClass (see the # in front). The storage class is one I created to have a “Retain” volume which can be mounted to new pods if the active one fails.
Afterwards I created the deployment for the MySQL container as well (mysql-deployment.yaml):
apiVersion: v1
kind: Service
metadata:
  name: drupal-mysql
  labels:
    app: drupal
spec:
  ports:
    - port: 3306
  selector:
    app: drupal
    tier: mysql
  clusterIP: None
---
apiVersion: v1
kind: PersistentVolumeClaim
metadata:
  name: mysql-pv-claim
  labels:
    app: drupal
spec:
  accessModes:
    - ReadWriteOnce
  #storageClassName: managed-premium-retain
  resources:
    requests:
      storage: 20Gi
---
apiVersion: apps/v1
kind: Deployment
metadata:
  name: drupal-mysql
  labels:
    app: drupal
spec:
  selector:
    matchLabels:
      app: drupal
      tier: mysql
  strategy:
    type: Recreate
  template:
    metadata:
      labels:
        app: drupal
        tier: mysql
    spec:
      containers:
      - image: mysql:5.7.21
        name: mysql
        env:
        - name: MYSQL_ROOT_PASSWORD
          valueFrom:
            secretKeyRef:
              name: mysql-pass
              key: password
        ports:
        - containerPort: 3306
          name: mysql
        volumeMounts:
        - mountPath: "/var/lib/mysql"
          subPath: "mysql"
          name: mysql-persistent-storage
      volumes:
      - name: mysql-persistent-storage
        persistentVolumeClaim:
          claimName: mysql-pv-claim
While the Drupal definition file exposes the drupal service using an external LoadBalancer MySQL just exposes port 3306 which you will have to set in the /sites/default/settings.php before the import.
Last but not least it’s necessary to have a kustomization.yaml to define the procedure of the both deployments:
secretGenerator:
- name: mysql-pass
  literals:
  - password=master
resources:
  - mysql-deployment.yaml
  - drupal-deployment.yaml
The password can be set using other options like K8s secrets or vault at a later stage. I kicked the deployment of to check if everything looks alright:
kubectl apply -k ./
kubectl get all
The output should look like this:
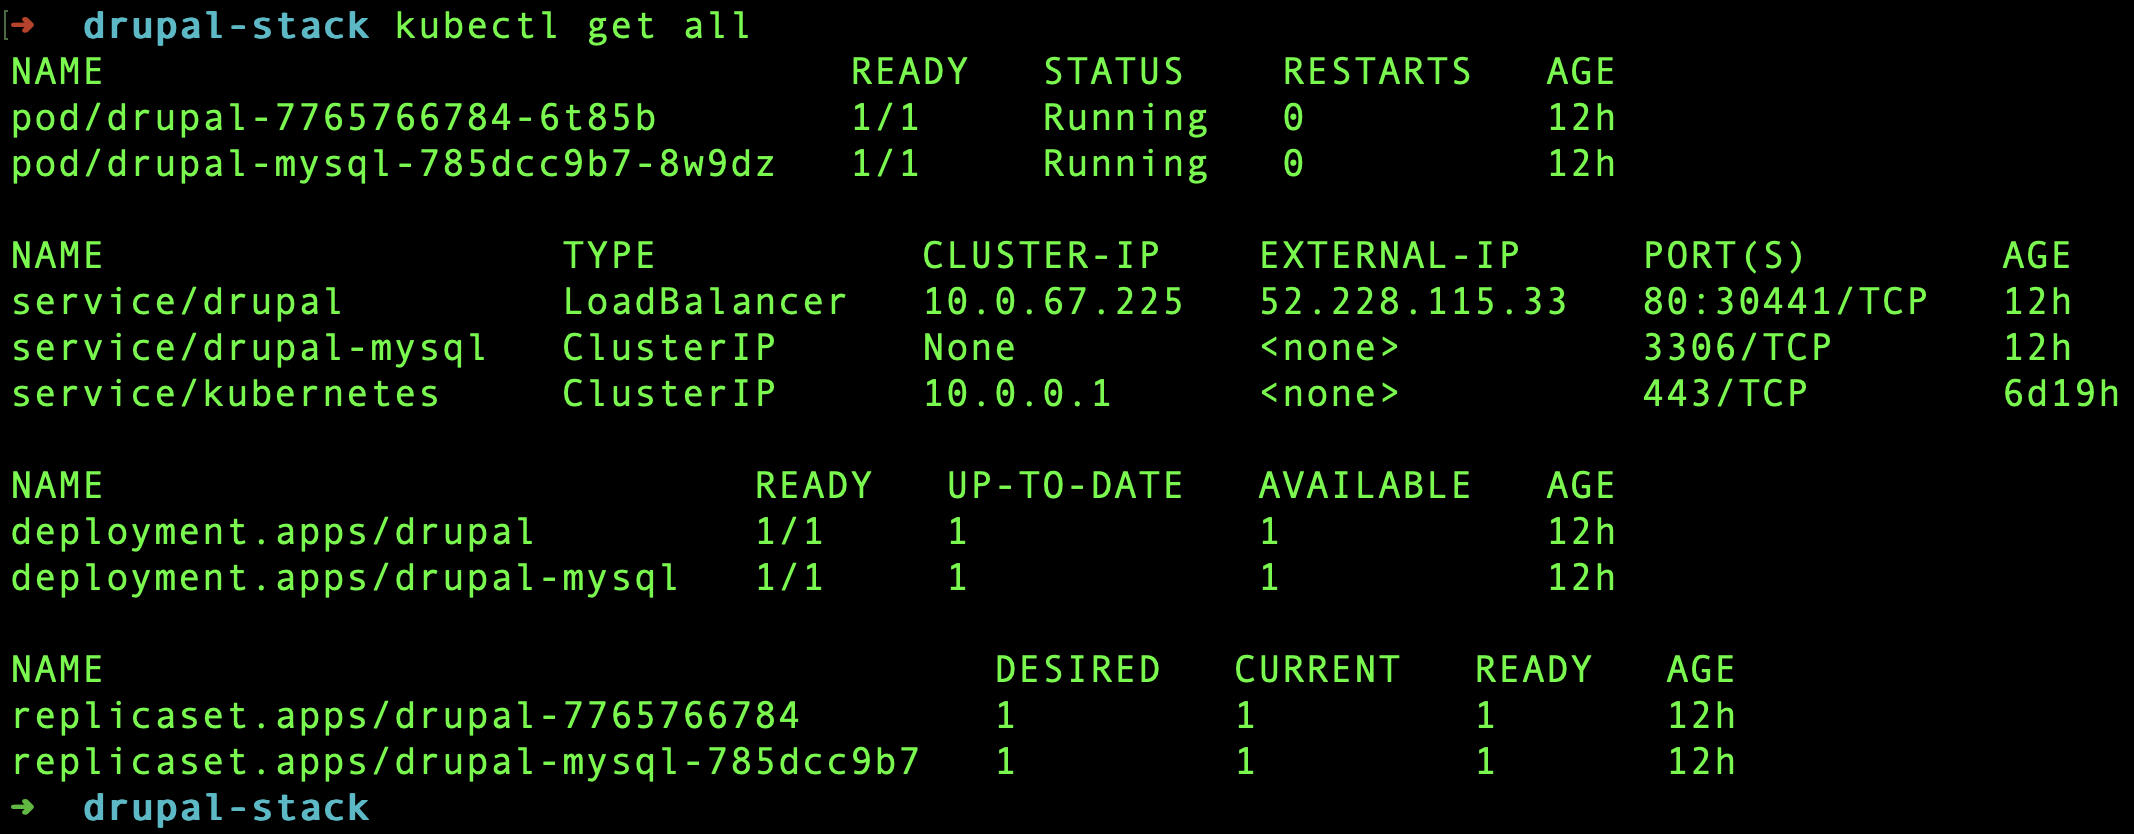
While you could access the external IP directly it would show the installation page of the Drupal 8 container and wouldn’t be able to connect to the MySQL service because the settings.php wasn’t changed accordingly.
Let’s import the database next:
kubectl exec -i PODNAME -- mysql -u root -pmaster -e "CREATE DATABASE mysitedb"
kubectl exec -i PODNAME -- mysql -u root -pmaster mysitedb < /Users/cjohannsen/Development/mysite/mysitedb.sql
which can be easily validated when checking the database directory:
kubectl exec PODNAME -- ls -la /var/lib/mysql
Now that the database is ready it’s time to import the Drupal site. This time I copied the whole site after I changed the settings.php:
using the kubectl cp command.
kubectl cp /Users/cjohannsen/Development/mysite/web/ PODNAME:/opt/drupal/
I renamed the www directory to web locally because the cp command does not allow any attributes. This import can be validated using the same command I used for the MySQL container:
kubectl exec PODNAME -- ls -la /opt/drupal/web
After this import I opened the public IP in a web browser and was able to see and use the site like I was in the old environment before.
Feel free to ask questions or comment if you’re facing the same challenge!
One Comment
This is cool but running MySQL in a pod seems dangerous